Understanding Perpetual Margin Types
Perpetual futures exchanges offer different perpetual margin types to manage collateral and risk. The two common modes are cross margin and isolated margin, each with distinct mechanics:
Definitions and Core Mechanics
Cross margin: All positions draw from a shared collateral pool. Your entire account equity acts as margin for any open trades. Unrealized P&L on winning positions can offset losses on losing ones, extending position longevity. However, pooled margin means severe losses in one position can erode collateral for others, risking cascade liquidations. Cross margin maximizes capital efficiency by using one margin pool for multiple markets.
Isolated margin: Each position has dedicated margin allocation. You explicitly assign funds as collateral for one trade, and only that amount is at stake. If the trade moves against you, other account funds remain untouched – losses are "isolated" to that position's margin. This mode contains risk per trade but requires more active management since each position must be monitored separately.
Some advanced platforms offer portfolio margin (risk-based margining across a portfolio). This system calculates requirements on net risk (considering correlations and offsets) rather than per position. Portfolio margin can reduce overall margin needs for hedged positions, but it's typically available to institutional or high-equity accounts and varies by venue.
Initial vs Maintenance Margin, Mark/Index Price, and Liquidation
Margin trading involves two critical thresholds: initial margin (to open a position) and maintenance margin (to keep it open). For example, an exchange might require an initial margin of 10% of position size (10× leverage) and a maintenance margin of 5%. This means: - When opening a trade, you must post at least 10% of the notional value as collateral (initial margin).
Once the position is live, you must maintain a minimum equity (5% of notional, in this example). If your equity falls below this due to losses, the exchange will liquidate the position.
Mark price vs. index price: To ensure fairness, exchanges use a Mark Price (often derived from a broader market index price) to calculate unrealized P&L and check margin levels. This prevents manipulation or a temporary wick on the platform from unfairly triggering liquidations. The index price is typically a weighted average of the underlying asset's price across major markets, and the mark price tracks this index. Liquidation is usually triggered when the mark price moves against your position enough that your margin ratio falls below the maintenance requirement.
Liquidation process: When your margin ratio (percentage of equity to position value) drops below the maintenance level, the exchange's risk engine initiates liquidation procedures:
Isolated margin: The specific position gets forcibly closed once its isolated collateral cannot cover losses
Cross margin: The system evaluates your total account equity versus the combined maintenance margin of all positions Liquidation priority: When overall equity becomes insufficient, the largest losing position is typically taken down first
Execution mechanics: Liquidation engines use the best available price to unwind positions, with liquidation fees typically deducted from your collateral
Cross margin dynamics: Can delay liquidations when profits elsewhere provide support, but eventual liquidations can impact your entire account
Each exchange may have its own formula for liquidation price; generally, higher leverage and tighter maintenance margins bring the liquidation price closer to your entry. For example, using 10× leverage with a 1% maintenance margin might put your long position's liquidation roughly only ~9% below your entry price (since a 10% drop would wipe out the 10% initial margin). Lower leverage or adding extra margin increases the buffer before liquidation.
Cross vs Isolated Margin: Practical Differences
Both margin modes let you trade with leverage, but they handle risk and capital differently:
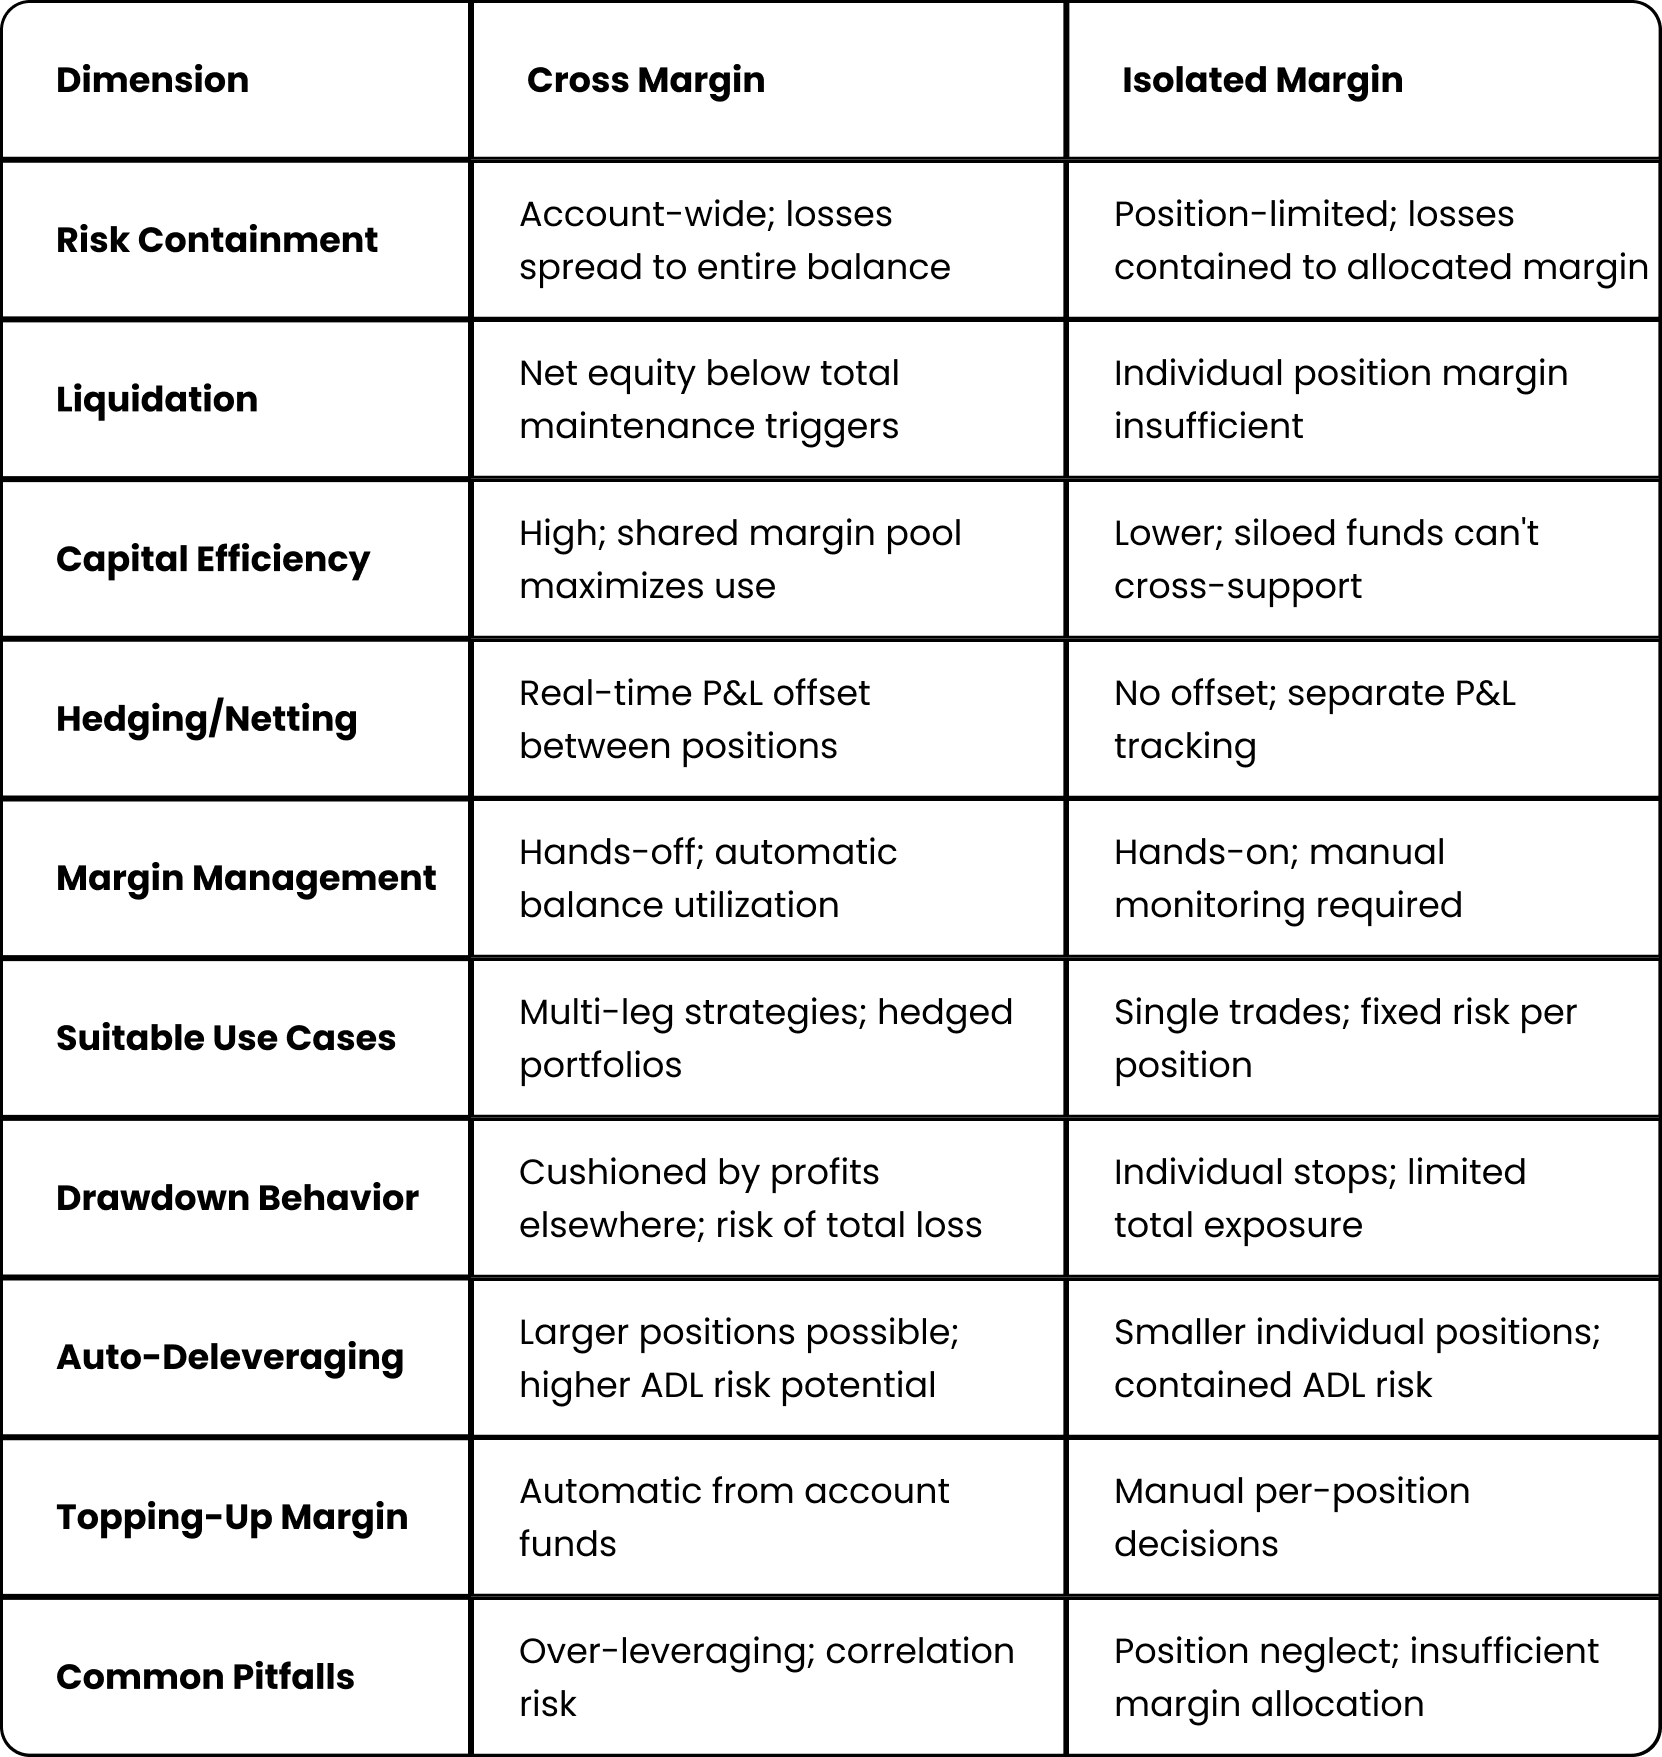
Collateral Sharing: Cross margin uses shared collateral where your entire balance automatically backs any position. Isolated margin uses segregated collateral—you cap risk on that position by isolating funds for it.
Risk Transmission: Cross margin can spread risk across positions—a big loss on one can consume equity supporting others. Isolated mode compartmentalizes risk where individual position failures don't affect others.
Liquidation Dynamics: Cross margin delays liquidation on losing trades when you have unrealized gains or excess funds elsewhere. However, continued losses risk larger liquidations affecting multiple positions. Isolated margin triggers faster liquidations but contains damage to specific trades.
Capital Efficiency: Cross margin is more efficient for active traders—all capital works as one pool, enabling more positions within the same equity. Isolated margin is less efficient as funds are siloed per trade.
Hedging and Netting: Cross margin excels for hedged portfolios where profits on one trade offset losses on another in real time. Isolated margin offers no such offset—each position's P&L is separate.
Operational Effort: Cross margin is hands-off regarding margin adjustments. Isolated positions need hands-on attention—you must monitor each one's margin status individually.
Fees and Funding: Both modes pay the same rates, but impact differs. Cross margin deducts all costs from the single equity pool, so large funding payments on one position can weaken margin for others. Isolated mode charges fees to individual position margins, potentially hastening liquidation if insufficient buffer exists.
Auto-Deleveraging (ADL) Impact: Cross margin enables larger aggregate positions since margin is pooled. If such positions liquidate during steep moves, they become ADL candidates when insurance funds are insufficient. Isolated positions are individually smaller, making liquidations more contained.
When Each Mode Fits
Both cross and isolated margin have their place. Here's how to decide which to use based on strategy and conditions:
Hedged & Multi-Leg Setups (Cross)
If you're running a multi-position strategy – for example, long on one perpetual contract and short on another as a hedge, or doing spread and arbitrage trades – cross margin is often the better fit. Because gains on one position can buffer losses on another, cross margin reduces the chance that one leg of a hedge gets prematurely liquidated. It's useful for:
Portfolio hedging: e.g. long BTC-PERP vs. short ETH-PERP. Cross margin treats the P&L in aggregate, so temporary divergence between the two won't knock out one side as easily.
Basis trading or spreads: Traders shorting a perpetual and longing the underlying (or another expiry) can use cross margin to lower overall margin needs (recognizing the offsetting risk).
Active trading with many positions: With cross, there's just one margin pool to watch. This simplicity helps when managing a complex book of positions – you ensure the account as a whole is well-margined, rather than juggling individual margin lots.
Why Cross? It provides maximum flexibility and capital efficiency when positions naturally offset or when you're confident in managing an entire portfolio's risk as one unit. Do note, however, that cross margin requires discipline: correlated positions can all move against you at once in a market-wide event, so broad risk limits are still crucial.
Discrete Directional Trades (Isolated)
For single, stand-alone trades or any position where you want to strictly limit potential loss, isolated margin is often preferable. This mode is ideal when:
Each trade has a separate thesis: If you're taking a directional bet on an altcoin perpetual, you might not want that one trade to possibly drain funds reserved for other ideas. Isolating margin ensures a blow-up on that alt doesn't kill your whole account – only the allocated margin is lost if it goes wrong.
High-leverage "punt" trades: When using very high leverage on a short-term trade, isolating the margin is safer. You pre-set how much you're risking (e.g., only $500 on a 20× leverage play). If it liquidates, that $500 is gone, but your core capital is intact.
Learning or testing new markets: New to trading a particular coin or an inexperienced strategy? Isolate the margin so any mistakes are contained. It's a form of self-imposed risk management – you can't lose more than you assign.
Why Isolated? It enforces risk discipline per position. Traders who like to compartmentalize their portfolio – say, a fixed dollar risk per trade – use isolated margin as a practical tool. It's also useful in extremely volatile conditions; if you're not monitoring 24/7, an isolated position can auto-close at a loss without dragging down everything else.
Volatile News Windows and Altcoin Pairs
During major news events or periods of high volatility, your choice of margin mode becomes even more critical. Market conditions should heavily influence which approach you take.
High Volatility Scenarios:
Major news events: Economic releases, crypto-specific announcements, regulatory changes)
Market crashes or sudden black swan events
Small-cap altcoin trading with extreme price swings
In these volatile conditions, consider favoring isolated margin unless you're actively managing a hedged book. Here's why: in cross margin, a fast black swan drop can rapidly eat through your pooled margin from all sides, whereas isolated positions will individually fall off as needed, potentially leaving some account equity untouched.
For small-cap altcoin perpetuals with wild swings, isolated margin offers additional protection. Those positions can be siloed so that a 50% swing in one token doesn't liquidate your other positions—a crucial safeguard when trading volatile, low-cap assets.
Stable Market Conditions: Cross margin becomes much more effective in steady markets. When volatility is low or your positions are in large-cap, more correlated assets, cross margin lets you ride out minor fluctuations without micromanaging each trade's collateral.
The Key Principle: Always match your margin mode to market conditions. In quiet, range-bound markets, cross margin offers convenience and capital efficiency. In whipsaw markets, isolation offers protection and damage containment.
Worked Examples (Step-by-Step)
Let's illustrate how cross vs isolated margin actually play out with numbers.
Example A — Cross Margin with Two Positions
Scenario: You have $1,000 equity in cross margin. You open two positions: 1) Long 0.1 BTC-PERP at $30,000 (notional $3,000) and 2) Short 5 ETH-PERP at $2,000 (notional $10,000). Initial margin is 10% per position: $300 for BTC and $1,000 for ETH, which your $1,000 equity covers thanks to risk offset in cross mode.
Positions offset each other: Bitcoin rises 10% (+$300 profit) while Ethereum also rises (-$300 loss on your short). Net P&L is near $0. In cross margin, the $300 BTC profit covers the $300 ETH loss, so neither position liquidates.
Positions move one-sided adverse: Ethereum surges, causing your short ETH position to lose $800 (ETH up ~8%). Bitcoin gains only $100. Net equity = $1,000 + $100 - $800 = $300. This falls below the combined maintenance margin needed (~$650 for 5% of $13k total notional), triggering liquidation. The exchange liquidates the larger losing position (ETH short) first, leaving the BTC long with minimal remaining equity.
Key takeaways: Cross margin allowed profits to support losing positions initially. However, deep losses in one trade consumed margin supporting everything. Cross margin delayed liquidation while there was offsetting P&L, but made all positions vulnerable when offsets failed.
Example B — Isolated Margin on a Single Position
Scenario: You go 10× long on XRP-PERP using isolated margin. XRP is $1.00, you buy 1,000 contracts = $1,000 notional. At 10× leverage, you put up $100 isolated margin (10% initial). Maintenance margin is 5% (~$50).
Calculating liquidation: With $100 margin on $1,000 position, your margin ratio is 10%. If XRP drops enough that equity hits $50, you're liquidated. A $50 loss triggers liquidation - that's a 5% price move (from $1.00 to ~$0.95). The exchange closes your position and you lose the $100 isolated margin. Crucially, other account funds remain untouched.
Topping up margin: If you add $100 when XRP is 3% down, total margin becomes $200, reducing leverage to ~5×. Liquidation would now require roughly a 15% drop from entry (losing $150 to reach $50 maintenance).
Aftermath if liquidated: Without topping up, XRP crashes 5%, position closes, you lose $100 isolated margin. Any other balance remains intact. In cross margin, the same trade would survive 5% initially but risk total account loss on continued decline.
Key takeaways: Isolated margin immediately caps maximum loss ($100). It provides a hard stop at 5% adverse move. Use isolated when you want unforgiving limits on what a single position can cost you.
Side-by-Side Comparison Table
Practical Risk Controls That Actually Help
Whether you opt for cross or isolated margin, sound risk management is non-negotiable. Here are actionable controls to safeguard your leveraged trades:
Align Leverage with Stop-Loss: Determine your stop-loss level first, then set leverage such that the liquidation price is well beyond the stop. In practice, this means not maxing out leverage just because it's available. Ensure your maintenance margin buffer would only be breached at a price move much larger than your expected worst-case. This way, you'll exit the trade on your terms (stop) rather than the exchange's (liquidation).
Maintain a Healthy Margin Buffer: Don't ride the razor's edge of maintenance margin. Aim to keep 2–3× the minimum required margin for each position under normal conditions. This extra cushion helps absorb unexpected volatility, fees, or funding payments. For isolated positions, this could mean initially allocating more than the bare minimum margin. For cross accounts, periodically check that your free equity comfortably exceeds total maintenance margin – especially after adding new positions.
Manage Position Concentration (Cross): In cross margin mode, be mindful of correlation risk. Avoid loading up many highly correlated positions (or one outsized position) that together could trigger a cascade. Diversification can fail if everything tanks together. Set internal caps: e.g., no single position should use more than X% of account margin, and make sure a single market event can't realistically liquidate your entire account.
Pre-Define Max Loss Per Trade (Isolated): When using isolated margin, decide on a maximum loss you're willing to take for that idea – and isolate only that amount. If the trade goes south, do not continuously add margin in desperation. Either stick to the initial allocation (and let it liquidate if hit), or have a strict plan like "I will add at most $Y once, if the thesis is still valid." This prevents the bad habit of doubling down indefinitely.
Set Alerts and Monitor: Use exchange alerts or external apps to notify you when a position's margin ratio is nearing danger (e.g., below 10% margin ratio or within X% of liq price). Timely alerts are crucial if you intend to manually intervene (either adding margin or closing the position) before liquidation. For cross margin, monitor your overall leverage and P&L – sudden shifts in one big position's P&L should prompt rebalancing or risk reduction across the account.
Always Use Stop-Losses: While not directly about margin mode, having stop orders for each position can prevent disasters. A stop-loss ensures that if a trade moves against you by a defined amount, you exit while you still have margin left. This is extra important in cross margin – a timely stop on one position can save account equity to support others. In isolated mode, a stop can save some of your allocated margin (instead of losing 100% on a liquidation). Think of stops as a first line of defense, margin liquidation as the last resort.
By implementing these controls, you significantly reduce the chance of forced liquidations and ensure that using leverage remains a tool for amplification, not ruin.
Conclusion
Choosing between cross and isolated margin comes down to how you want to balance flexibility versus control. Cross margin offers greater capital efficiency and can keep your trades alive longer by sharing resources – it's favored for sophisticated strategies where positions hedge or complement each other.
However, it demands vigilance: you must manage total exposure and correlations to avoid a domino effect on your whole account. Isolated margin, on the other hand, compartmentalizes each trade's risk. It's the mode of choice for clear-cut positions with defined risk, ensuring one bad trade doesn't sink your entire balance.
The trade-off is more frequent micromanagement and potentially earlier liquidation if you're not attentive. In practice, many seasoned traders mix both approaches: using cross margin for a core portfolio or correlated bets, but switching to isolated for speculative one-offs or during turbulent market windows.
By understanding the mechanics of each and following strict risk management, you can confidently choose the right margin mode for each strategy, market condition, and risk tolerance – using the tool, instead of letting it use you.
Trade Smarter with ApeX Omni Unlock the full potential of decentralized trading on ApeX Omni. From crypto perpetuals and spot markets to U.S. stocks and prediction markets, everything you need is in one place. With deep liquidity, powerful trading tools, and zero gas fees, ApeX Omni makes it easy to build and execute strategies that match your trading style.
Earn While You Learn — $100 USDT Per Quest Your trading knowledge can now pay off. Join our Learn & Earn series on Galxe, where each quick quiz you complete rewards you with $100 USDT.
Simply connect your wallet to ApeX Omni, take the quiz, and claim your reward. Fast, simple, and designed to help you grow while you earn.